The process of manually migrating content from SiteNow v1 to the new SiteNow v3 platform can seem daunting. But for most sites, the process is pretty straightforward and you don't need to learn everything about the new platform to do it. To get started, you'll want to log into both your old site and the new site.
For most sites, there is a "Login" link in the footer that you can click. If you don't see that link, you can also log in by visiting the homepage of your site, clicking into the address bar of your browser, and appending /user to the end of the URL. So, for this site, I would visit https://sitenow.uiowa.edu and then add /user to the end, resulting in https://sitenow.uiowa.edu/user. Hitting "return" (or "enter") will take you to the screen where you can use your HawkID to log in.
Review Existing Content
To see a list of all content on your v1 site, click the "Content" link in the administrative navigation at the top of your screen. The Content Overview page will show you a list of your content and includes additional information (such as when a page was last updated and by whom) as well as some operation links. From here, you can see how many pieces of content need to be migrated. This is a good opportunity to review the content you have published and to see if there is anything that you no longer need or that isn't relevant anymore. There is no need to migrate any content that you don't want on the new site. It is also not necessary to migrate any demo content.
Migrating Content
Pick a piece of content from the list and let's walk through migrating it. In the table row for the piece of content you select on your v1 site, click the "Edit" link. This will take you to the screen where you would edit content if you were updating it. On your v3 site, click the "Content" link in the administrative navigation at the top and the click the "Add content" button on the page that comes up. Select the appropriate content type for the piece of content that you are moving over. For each content type, there is usually a field on the new v3 site for pasting the field you copied from the v1 site. Go through the fields and copy/paste the field content from the v1 field to the v3 field. Once you are done, if you are confident that everything is copied over and there are no additional edits to make to migrate the content, you can go ahead and set the v3 version of the content to published. If you are unsure or know that you need to make additional edits, you can leave the content in draft state.
This distinction of "draft" versus "published" can be a useful way of keeping track of which content you are done migrating versus content you intend to revisit or need to migrate additional fields for. As you get a page to the point where you consider it fully migrated, you can publish it.
Images
If you have images contained in text area fields (such as the body field) there are additional steps to ensure that the image is brought over. If you copy/paste from one body field to another, it may actually look like the image got copied along with the rest of the text, but that is a quirk of the system. Unfortunately, the way that images are represented in text areas has changed between the old system and the new system and the new system isn't smart enough to process the old image references.
It is recommended that you download existing images and files from the website for use with the new website. Go to Content > Files (admin/content/file) For images, click the edit link and then click the Image Preview link which will load the original uploaded image. For documents click the file name title link and this will display a link to the file. For both images and documents you can right-click on the image/file and click Save As..
On the edit screen of the v3 version of the content, click the thumbnail of the image in the text area to select it and then hit the delete button on your keyboard to delete it. Then use the on-screen media button above the text area to insert a new image at the same location. You can find more details about this process in our documentation.
You may find that some images/files are no longer needed and don't need to be downloaded/uploaded.
Links
Copied and pasted links also may not work without being fixed. If the link is external to your site (pointing to another site, such as uiowa.edu), then you don't need to do anything. If the link is internal to your site (pointing at a piece of content or another page on your site), then you'll need to fix the reference to the link in the text area. If the piece of content that is being pointed to by the link is already migrated, you can fix it right away. If the piece of content being pointed to is not already migrated, you'll need to come back and fix it after that piece of content has been migrated.
Updating an Internal Link

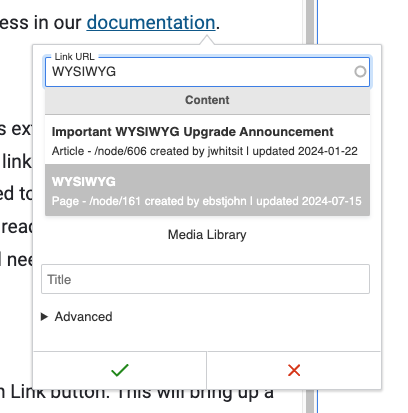
Start by clicking somewhere on the link to select it, then click the on-screen Link button. This will bring up a dialog window that can be used to find the piece of content. Start typing the name of the page you are linking to in the "Link URL" field. As you type, a list of suggestions will be shown below. When you see the piece of content you are looking for in the list you can click it to select it. Finally, click the checkmark icon to save the link.
Pre-launch Checklist
After you have migrated the rest of your content, there are a few more items to make sure that your site is ready for launch. This list covers the most common things we encounter when people contact us to launch their sites. For a full list of pre-launch task, please consult https://webcommunity.sites.uiowa.edu/strategy/launch-checklist
Site Name and Email
Each site is required to set a real site-wide email address and a name that is different from the URL. This can be done by clicking Configuration > Basic Site Settings from the administrative navigation.
Unpublish or Delete Demo Content
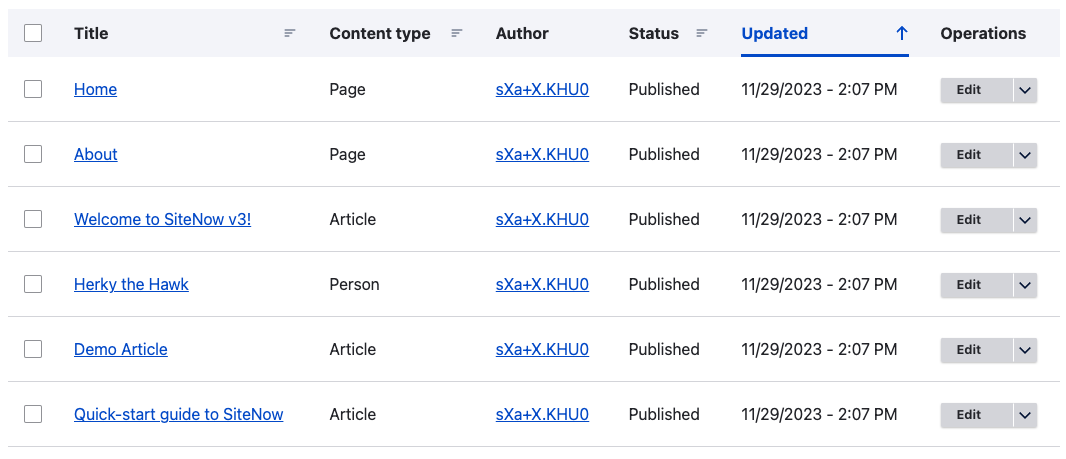
When you visit the Content Overview page on a newly provisioned v3 site, you'll see the following content:

This content is provided as a reference but should not be published when the site is launched. It is enough to unpublish it, but it is also okay to delete it if you are done using it as a reference. The exception to this is the "Home" page. SiteNow v3 requires a page to be registered as your home page and default "Home" page is registered that way. The easiest thing to do is to use the demo "Home" page as the starting point for your site's homepage. If you want to start from scratch, you can do this by visiting the "Layout" tab from the "Home" page (or by clicking "Layout" in the drop-button list under "Operations" in the Content Overview). On the "Layout" screen, click the "Revert to Defaults" button to discard the demo layout and start with a fresh version of the page.
Fix prod.drupal Links
Sometimes people forget about using the built-in linking tools and instead just copy and paste links. The issue with these copied/pasted links is that they likely contain the full URL of the site, which is not the final production URL when the site is launched. This means that when the site is launched, any link like that is immediately broken upon the domain being updated to its final production URL. To find and fix these types of links, you can use the Find Text tool. Click "Find Text" in the administrative navigation and enter prod.drupal into the "Search Text" field and click the "Search" button. You'll see a list of instances where a link was found to contain prod.drupal. All of these links will need to be fixed before they can be launched.
Contact Us to Launch Your Site
Once you have completed the above steps, your site should be ready to launch. You can contact us by responding to one of the automated emails you may have received about your site or directly at its-web@uiowa.edu.